Contents
- 1 Introduction
- 2 Choosing between Windows Server 2022 ISO and VHD
- 3 Downloading the VHD or ISO directly to the Proxmox host
- 4 Creating a new VM ready for Windows Server 2022
- 5 Converting the VHD for use in Proxmox
- 6 Importing the disk image into the VM
- 7 Attaching the imported disk
- 8 Changing the Proxmox VM’s boot order
- 9 Completing the installation of Windows Server 2022
- 9.1 Step 1 – Power on the Server 2022 VM
- 9.2 Step 2 – Launch the console
- 9.3 Step 3 – Provide regional settings
- 9.4 Step 4 – Review and accept Microsoft’s license terms
- 9.5 Step 5 – Choose an administrator password
- 9.6 Step 6 – Logon to Windows Server 2022
- 9.7 Step 7 – Installing the VirtIO drivers and guest tools/agents
- 10 Enabling the QEMU guest agent and SPICE agent features
- 11 Conclusion
Introduction
Although Microsoft released Windows Server 2022 way back in the latter half of 2021, I still hadn’t tried it out until last week. The truth is, I’d not had a need to deploy any new Windows Server instances over the past year and I didn’t want the hassle of upgrading my older Windows Server 2019 instances to 2022.
A few days ago, I decided it was time to set up another file server and thought it was about time I gave Server 2022 a try. As my regular readers will know, I’m a big fan of Proxmox and use it to run most of my virtual machines.
I’m running the current version of Proxmox VE (7.2 at the time of writing) so didn’t anticipate any problems with running Server 2022 on top of it. There were no articles that I could find specifically around getting Server 2022 up and running on this hypervisor but that’s understandable with this version of the Microsoft OS still being quite new.
Microsoft offer Server 2022 in a couple of different formats (ISO and VHD). I’d decided to take the VHD route and actually found the process a little tricker than I’d anticipated. For this reason, I’ve decided to make a few notes and put them into this post. Hopefully, this will help “future me” and perhaps even some of my readers too.
Choosing between Windows Server 2022 ISO and VHD
As mentioned, Microsoft offer not only the traditional ISO installation media but also a VHD file intended for deploying virtual Server 2022 machines. VHD stands for “Virtual Hard Disk” and it’s basically a file that contains all the data that a traditional hard drive would. In other words, you can attach a VHD file to a hypervisor (such as Hyper-V) and the system will use the VHD in place of the hard drive. When the virtual machine reads from or writes to its virtual hard drive, the hypervisor will perform these operations against the VHD.
As I wanted to run Server 2022 inside a virtual machine, I decided that choosing to download the VHD rather than the ISO would make more sense. Although the VHD is primarily intended to be used with Microsoft’s own hypervisor (Hyper-V) or cloud computing platform (Azure), it’s a standard format and I was sure I could get it to work with Proxmox.
Why did I choose the VHD over the ISO? Well, to me it made sense that Microsoft would tune the Windows installation to run in a virtualized environment (for example, drivers for virtual hardware would already be in place).
Of course, should you prefer, there’s no problem with downloading the ISO instead and performing a regular installation, much as you’d do if you were deploying the operating system to a physical, bare-metal server rather than onto a VM.
Downloading the VHD or ISO directly to the Proxmox host
I’m going to be deploying the evaluation version of Server 2022 as I don’t currently have a license to run it. Once the evaluation version expires in 180 days, I’ll decide whether or not I wish to retain it. If it’s proven its worth over that six-month period, it’s easy enough for me to purchase it, enter my new product key and convert Windows from the evaluation version to the real thing.
Step 1
Head over to the Microsoft Evaluation Center for Windows Server 2022
Step 2
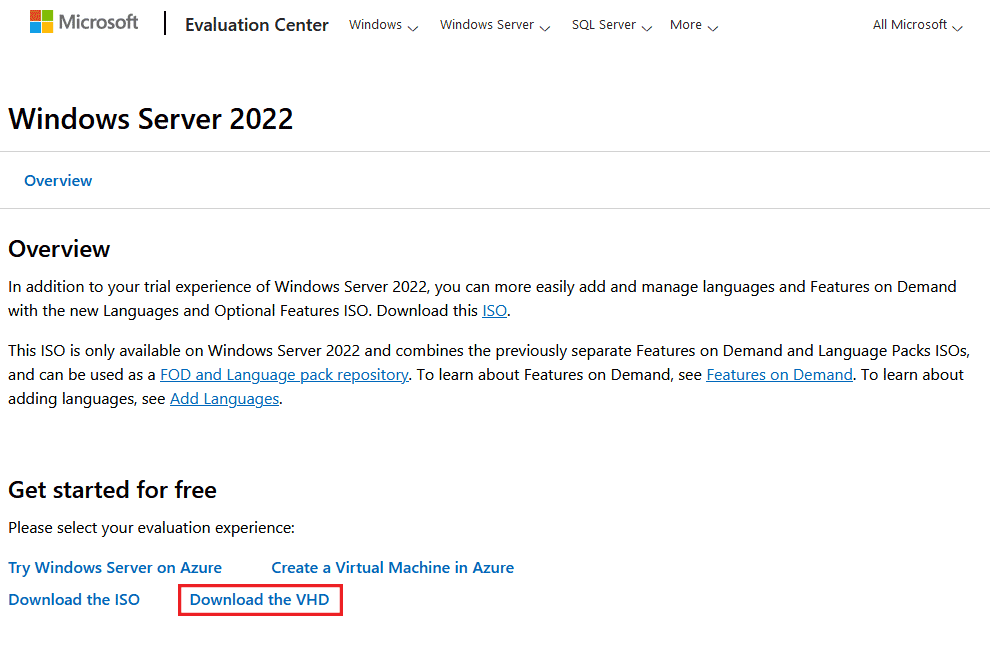
Click on the link titled “Download the VHD” (or “Download the ISO” if you’re planning a traditional installation).
Step 3
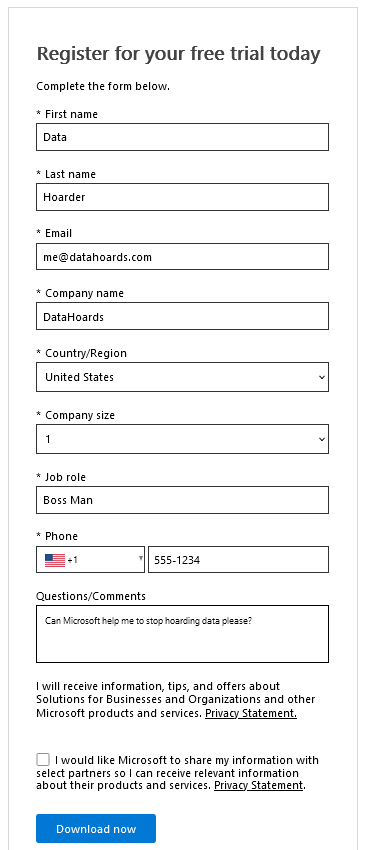
You’ll be presented with a page asking you to “Register for your free trial today”. Simply enter your details into the form and click “Download now”.
Incidentally, I didn’t need to validate my email address by clicking an emailed link or entering a code. Not that I would ever suggest entering false details merely to get to the next page, of course.
Step 4
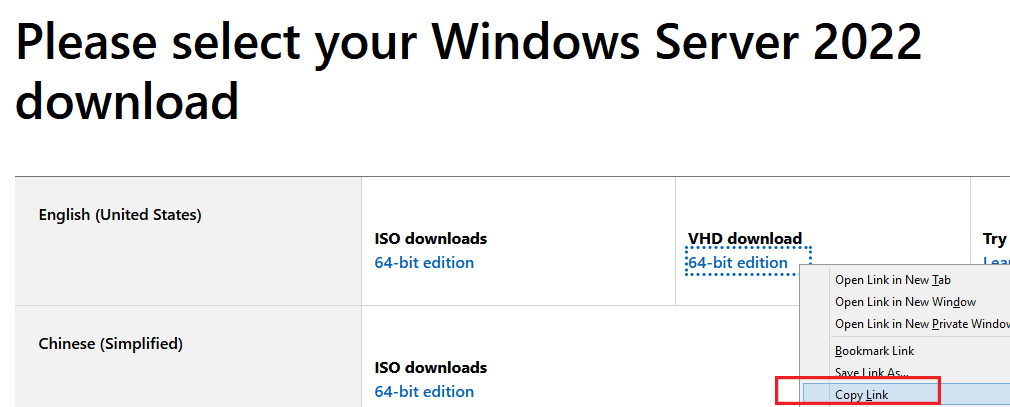
At this point, you should find that you’re presented with a list of download links. You don’t want to click the link as that will download the ISO or VHD file to your computer. Instead, you want to copy the download link to your clipboard. Later we’ll use this link to download the ISO or VHD directly to the Proxmox host.
Find your preferred language and then right-click on the download link titled “64-bit edition”. Then click either “Copy” or “Copy Link”, depending on the browser you’re using.
Step 5
Now that we have the download link to the Server 2022 media, we need to download it directly to the Proxmox host. You can access the host however you prefer (SSH, console, etc) but I’m going to SSH into it using PuTTY.
Once you’re logged in and at the Bash prompt, you need to change to the directory (using the “cd” command) that will hold the download. I want to download the VHD to the temporary directory so I enter “cd /tmp”

Step 6
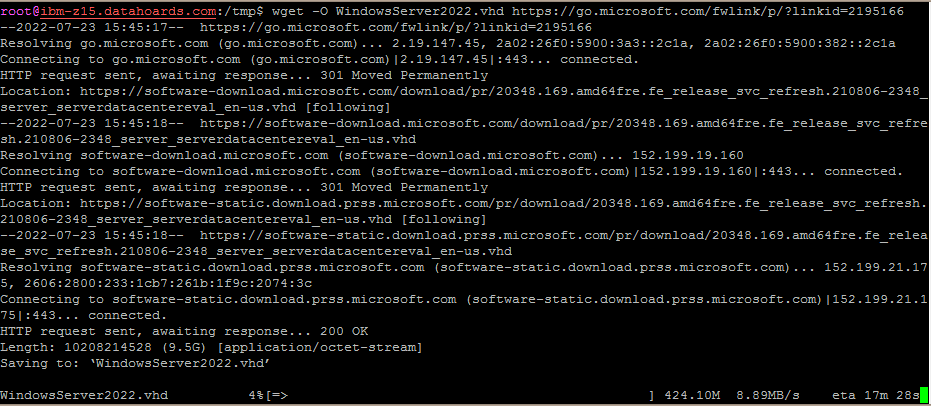
We’ll use “wget” to initiate the download. The full syntax we’re going to use is:
wget -O <NewFilename.vhd> <Download URL>
Something to note is that the download URL may contain an ampersand (&) character, and this will confuse Bash as it’ll think we’re trying to run the command in the background. Luckily, we don’t need any of the parameters in the URL after the first ampersand so we can just remove them.
For example, the download URL that I have for the English version of Server 2022 is:
https://go.microsoft.com/fwlink/p/?linkid=2195166&clcid=0x409&culture=en-us&country=us
but as we don’t need anything after the first ampersand, I’m going to shorten it to:
https://go.microsoft.com/fwlink/p/?linkid=2195166
Therefore, for me, the complete command will be:
wget -O WindowsServer2022.vhd https://go.microsoft.com/fwlink/p/?linkid=2195166
Of course, your link will be different so remember to substitute it. You may proceed to the next step whilst the download is taking place.
Step 7
This step is optional and only applies if you’ve chosen to download the ISO rather than the VHD.
You’ll want to move the downloaded ISO file from the temporary directory to the /var/lib/vz/template/iso/ directory. This will allow the ISO to be accessible through the Proxmox GUI and will allow you to easily attach it to a VM’s virtual CD/DVD drive.
The command, of course, is simply:
mv WindowsServer2022.iso /var/lib/vz/template/iso/
Creating a new VM ready for Windows Server 2022
The next step is to create a new Virtual Machine with appropriate resources. We can do this even if the VHD is still being downloaded, as we don’t need to make any reference to it yet.
I won’t go over the individual steps to creating a VM in Proxmox. If you’re reading this post then I’m sure you’re already aware of them. Instead, I’ll show you the virtual hardware/resources that I chose for my Server 2022 machine:
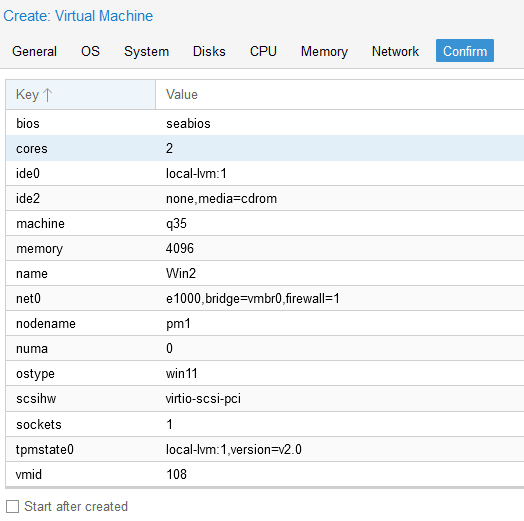
You can of course alter the virtual hardware allocation as you see fit. If you have a powerful Proxmox host, you may wish to allocate more CPU cores or more RAM, for example.
One point to note is that I had to change the virtual machine’s BIOS type to “SeaBIOS”. Initially, I tried to use “OVMF (UEFI)” as Microsoft listed UEFI as one of the system requirements for Windows Server 2022. I can only assume that the bootloader inside the VHD that Microsoft have published, has been adapted to require a traditional MBR-style BIOS. Perhaps Hyper-V prefers this type of image for some reason.
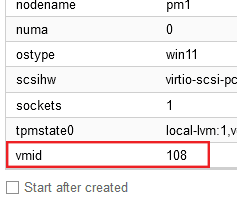
It’s worth making a note of the “vmid” value (the virtual machine’s unique ID number that Proxmox uses) at this point, as we’ll need it later on when importing the disk image.
Converting the VHD for use in Proxmox
Proxmox isn’t able to run a virtual machine directly from a VHD file. Instead, we need to convert the VHD to a different format.
Fortunately, Proxmox includes a piece of software known as qemu-img (“QEMU Disk Image Utility”, to give it its proper name) that we can use to convert the disk image. Proxmox uses the “QCOW2” (“QEMU Copy-On-Write”) disk image format by default so that’s what we’ll convert our VHD to.
The syntax of the qemu-img tool is “qemu-img convert <SourceDiskFilename> -O <DestinationDiskFormat> <DestinationDiskFilename>”
Therefore, to convert our Server 2022 disk image from VHD to QCOW2, the complete command will be:
qemu-img convert WindowsServer2022.vhd -O qcow2 WindowsServer2022.qcow2

Importing the disk image into the VM
Now that we have our Server 2022 in the QCOW2 format, we must import it into our new VM. Before we can do this, however, we need to know the ID number of the VM (“vmid”).
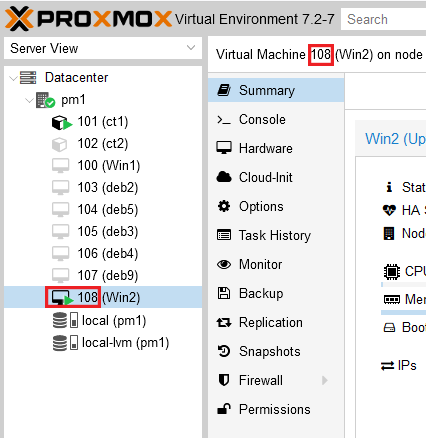
If you made a note of the ID when creating the VM then great, if not, you can easily find it through the Proxmox Web interface. For example, it prefixes the VM’s name, in the left-hand pane:
Again, the tool used to import the disk image is included with Proxmox so we don’t need to install any extra software. The tool is called “qm” and the syntax to import the disk image is “qm importdisk <vmid> <SourceDiskFilename> <Destination>”
In our case, the command will be:
qm importdisk 108 WindowsServer2022.qcow2 local-lvm
The command will take a few minutes to run, and it will then report the “logical volume” that has been created from the disk import:

Attaching the imported disk
The next step is to attach the newly imported disk to the new VM. Head over to the Proxmox Web interface, click on your new VM and go to the “hardware” section. You should find that the imported disk is sitting there as “Unused Disk 0”, with the disk id reported earlier, following the import.
At this point, we no longer need the original “placeholder” disk that was created alongside the VM itself. To remove it, click on it, and then click “Detach”. Confirm the action if prompted.
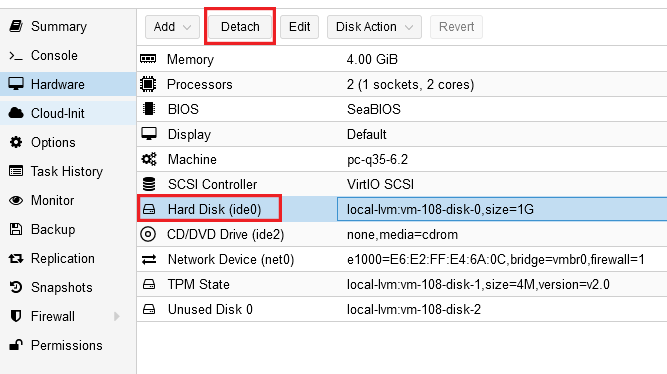
With the old disk detached, it’s easily deleted by clicking on it, and then clicking “Remove”. Once again, confirm your intention to remove the disk, if asked for confirmation.
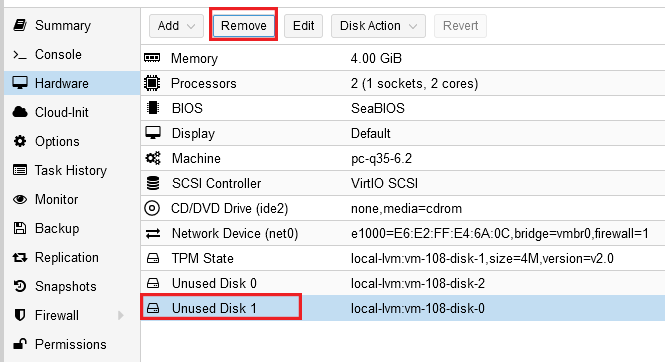
Now, to attach the new disk, simply double-click it, then click “Add”.
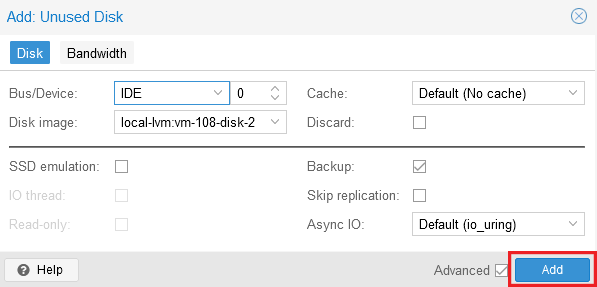
It’s important that we perform these steps in order, so that the newly imported disk is attached to IDE controller “ide 0”. If we attached the new disk before we removed the old placeholder disk, Proxmox would assign it to “ide 1”, meaning we’d be unable to boot from it. This is because VM’s can only boot from master devices and not slaves, so Proxmox would give you the cryptic message “Can’t create IDE unit 1, bus supports only 1 units“. Please don’t ask me how I know this 🙂
Changing the Proxmox VM’s boot order
At this point, we’ve removed the small 1GB “placeholder” disk that we no longer need, and imported and attached the new Server 2022 disk. Following these changes, we need to update the boot order so that the VM will correctly boot from the new Window Server disk.
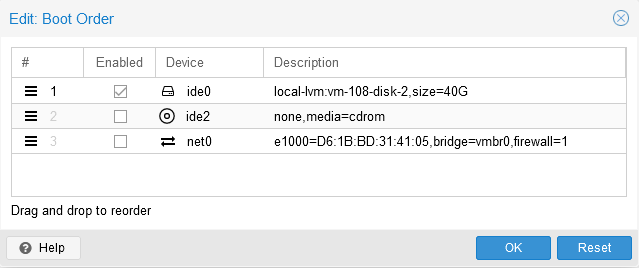
We know that the new disk is “ide 0”, so click on “Options”, then “Boot Order” and then “Edit”.
You can now enable or disable boot devices as you see fit, as well as dragging and dropping them to the order you prefer. For me, I like all of my Proxmox VMs to be able to boot only from the main disk, without attempting to boot from CD/DVD drives or network (PXE) devices. This speeds up the boot process a little.
To achieve this, and to keep things simple, I’m going to therefore leave the boot order as it is, but disable everything except “ide 0”:
Completing the installation of Windows Server 2022
Most of you will probably want to skip over this section as you’ve probably installed various versions of Windows a million times. The process for Windows Server 2022 is much the same as with any other version but I’ll list the basic steps here, nonetheless.
Step 1 – Power on the Server 2022 VM
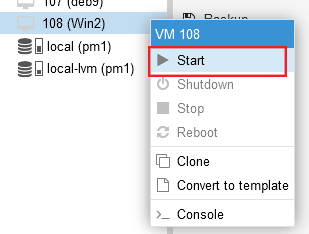
Head over to the Proxmox Web GUI and find your new Server 2022 VM. Right-click on it, and click “Start”.
Step 2 – Launch the console
Once the VM has started up, simply click on the “Console” button in the top right-hand corner of the Proxmox interface.

This will launch a new browser window that will display the VM’s screen contents (i.e. what you’d see on your computer monitor if the VM was a physical server).
Step 3 – Provide regional settings
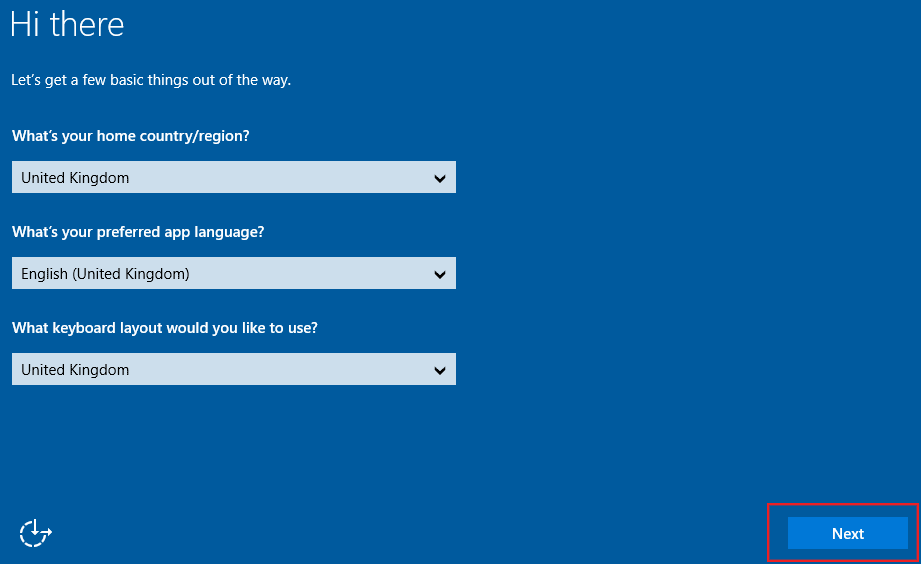
The first Server 2022 setup screen you’ll be presented with will ask for some regional information. Simply select your country, preferred language, and keyboard layout. Then click “Next”.
I’m going with all “UK” settings but I suspect most of my readers will be selecting “United States” at this point.
Step 4 – Review and accept Microsoft’s license terms
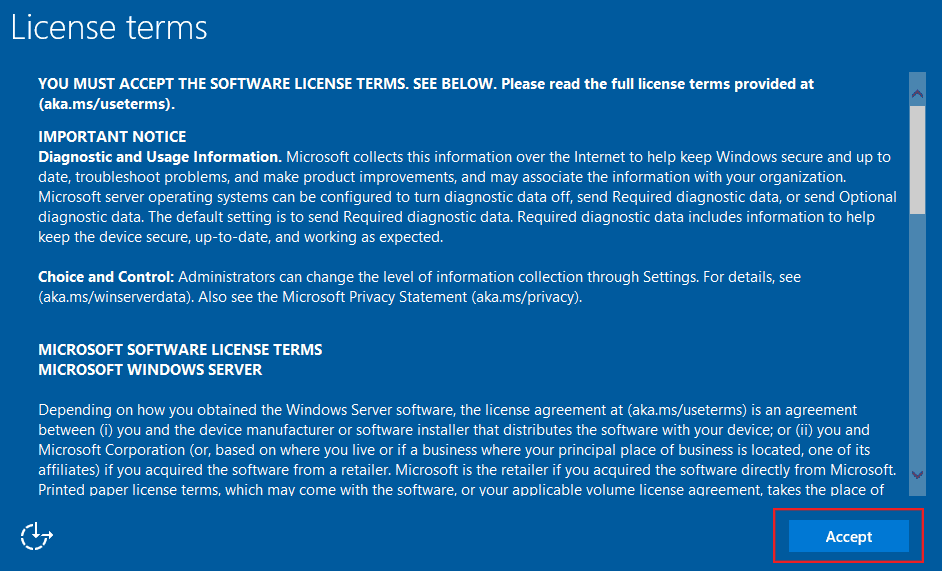
Here’s the boring bit. You’ll need to read through the Windows Server 2022 license terms and then choose to accept or reject them.
I’m going to reluctantly accept them (the alternative is to give up and not use Windows!).
Step 5 – Choose an administrator password
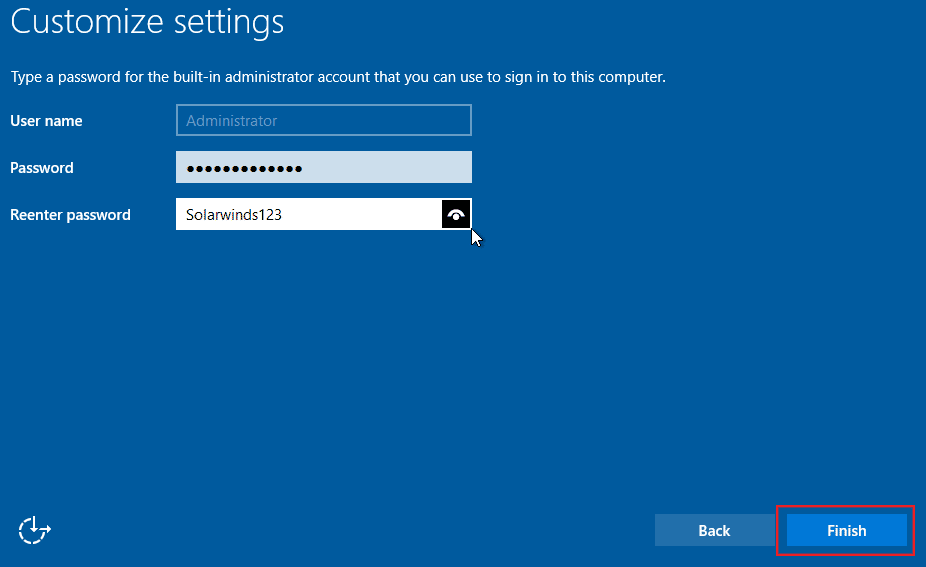
During the setup routine, Windows will automatically create an administrator account for you. At this stage, it’s important that you select a strong password. Don’t use something that’s easy to guess (such as “Solarwinds123”).
Enter your chosen password twice, then click “Finish”
The VM will automatically restart, so sit tight for a few minutes.
Step 6 – Logon to Windows Server 2022
Unlike some of the more recent consumer versions of Windows, Server 2022 still requires you to press CTRL-ALT-DELETE to send the Secure Attention Sequence when logging on.
Of course, we can’t do that as we’re running Server 2022 inside a virtual machine. Instead, we must tell the Proxmox hypervisor to simulate the sending of this key sequence.
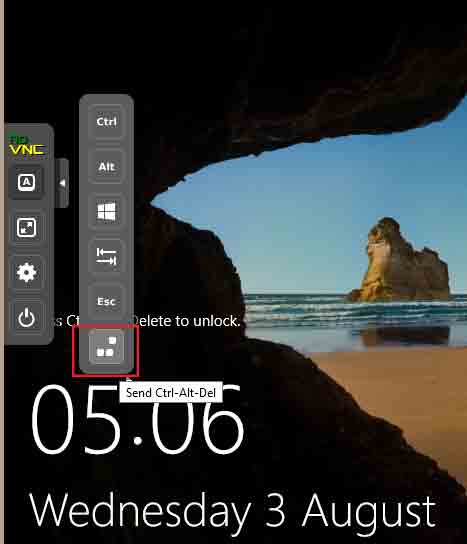
It’s very easy, just click the small arrow on the left-hand side of the console:
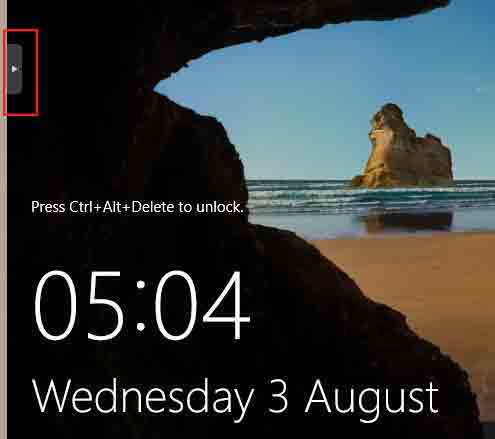
This will pop out the noVNC additional settings menu. From here, click on the icon depicting a keyboard key (hovering over it will display “Show Extra Keys”). Now click on the bottom icon (“Send Ctrl-Alt-Del”):
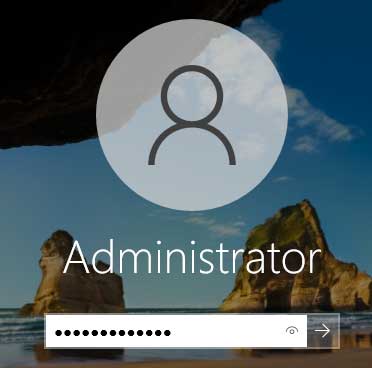
Now simply enter the administrator password that you chose in Step 5 and hit Enter.
Step 7 – Installing the VirtIO drivers and guest tools/agents
The Server 2022 VHD that we downloaded from Microsoft doesn’t include the VirtIO drivers. This makes sense because the image was intended for deployment on Microsoft’s Hyper-V hypervisor but we’re instead using Proxmox.
If you check in Device Manager, you’ll see that there are a couple of devices with either missing or generic drivers. For example, there’s this “PCI Device” that’s triggering a warning due to there being no driver present:
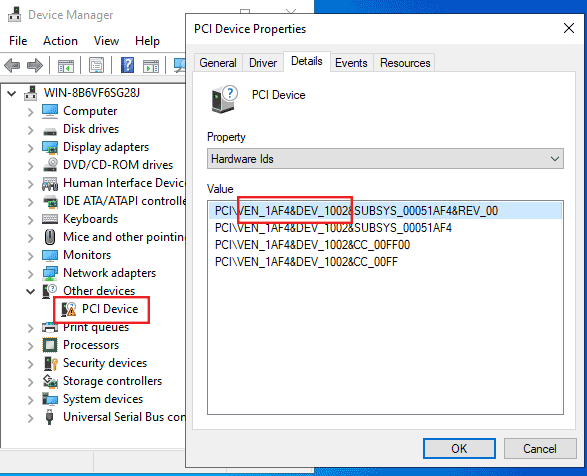
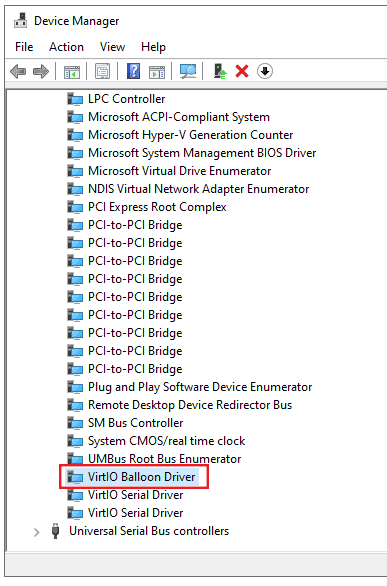
A quick Google of the PCI vendor ID (1AF4) and the device ID (1002), tells us that this is the VirtIO memory balloon. Although not critical, it would certainly be nice to get this device up and running with the correct driver (the memory balloon device allows Proxmox to reclaim some of the guest’s allocated memory).
Proxmox includes installation media for a version of the VirtIO drivers, however, they’re constantly being updated and improved so I always prefer to just download the latest stable version from the Internet.
There are a couple of ways to achieve this. One way is to download the VirtIO drivers ISO to the Proxmox host and mount the ISO to the VM’s virtual CD/DVD drive. Another way is to download the drivers from within the VM directly.
I prefer the second method, as the Windows VM already has Internet access (thanks to the virtual Intel E1000 NIC already having its driver present in the Server 2022 disk image) so it’s just a bit faster/easier.
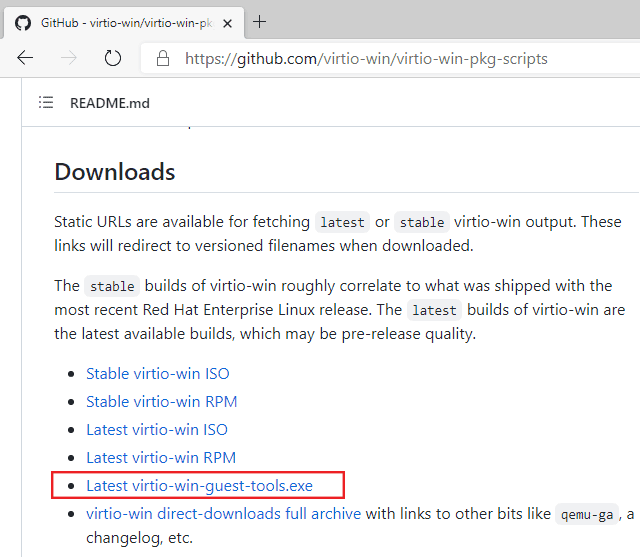
From within the new Windows Server 2022 VM, you’ll want to launch Microsoft Edge, and then download virtio-win-guest-tools.exe from https://fedorapeople.org/groups/virt/virtio-win/direct-downloads/latest-virtio/virtio-win-guest-tools.exe
This is somewhat easier said than done as you’re not going to be able to copy and paste to the virtual machine yet. If you’re confident of your typing ability, you can just type the full URL directly into the Edge address bar and hit enter.
If you don’t fancy typing that long URL, you can get to it fairly easily by doing the following:
Visit github.com/virtio-win

Click on the virtio-win-pkg-scripts link
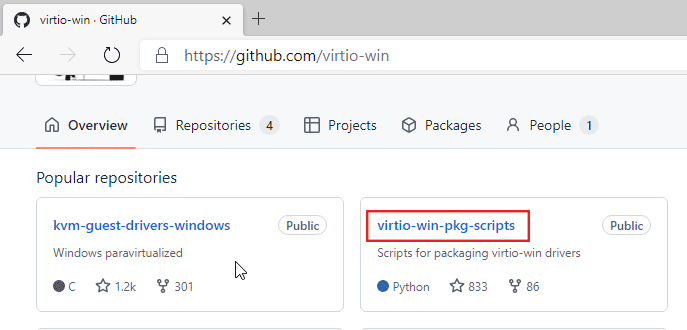
Scroll to the Downloads section and click the “Latest virtio-win-guest-tools.exe” link
Once the download has completed, run the executable, and accept all the suggested defaults by clicking “Next” (a “Next, Next, Next install” as we call it in the business). The installer will install all drivers, as well as the QEMU guest agent and the Spice agent.
If we check Device Manager once more, the situation looks a lot better. As you can see, all devices have drivers and the “PCI Device” is now correctly identified as being the VirtIO memory balloon device:
Enabling the QEMU guest agent and SPICE agent features
With the QEMU and Spice agents installed, we can enjoy some added functionality. We just need to quickly enable it first, from within the Proxmox Web interface.
Step 1 – Shutdown the Server 2022 VM
Step 2 – Click on your VM and then go to “Options”
Step 3 – Enable QEMU agent
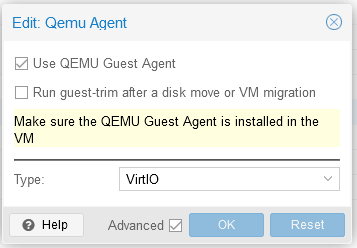
To do this, double-click on “QEMU Guest Agent”, then tick the box next to “Use QEMU Guest Agent”, change the type to “VirtIO” and click “OK”.
Step 4 – Change the display to “SPICE”
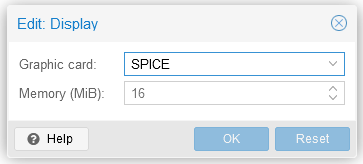
To do this, click on “Hardware”, and then double-click on “Display”. Change the “Graphic Card” drop-down to “SPICE” and then click “OK”.
Conclusion
Well, that’s all there is to installing Microsoft’s latest and greatest server-class operating system to a Proxmox VM.
In my opinion, deploying Server 2022 from Microsoft’s official VHD image is a lot easier than performing a vanilla installation from the ISO installation media. On paper (or screen!), there appear to be a lot of steps but honestly, it didn’t take me very long at all. Going forward, I’ll be using this method to deploy future instances of Windows Server 2022.
It would be nice if Microsoft provided a deployment image that was natively compatible with Proxmox but it’s quite understandable why they’re not inclined to do so, given that they have a competing product (Hyper-V).
With that said, it only takes a minute or two to convert and import the VHD for Proxmox use and you end up with an installation that’s been tweaked to run well in a virtualized environment.
As always, I’m more than open to any questions or comments so feel free to get in touch. Happy data-hoarding people!

It was a very useful article. Thank you.
Thank you so much.
Hi. Thanks for your post. Do you tested or have experience with the utilization of hyper-V inside the Windows Server VM you created on proxmox using nested virtualization?
I have a server, than i have instaled proxmox 8, crete a windows server 2022 vm, and activate nested virtualization sing hyper-V, to run 3 Windows Servers VM’s inside (AD, Windows File shares, and my Contablistic software.
What do you think?
The adavantage for this scenario for my is the easy way whow can i do backups from VM’s…
Thanks,
Pedro